

How To Set Rows As Print Titles In Excel
If you ofttimes print your work in Excel, you would do good from knowing how to make sure a row (or multiple rows) print on every folio that you impress.
This is oft needed every bit you want the data row headers to be visible and so that information technology'south easier to know what a information betoken represents.
Thankfully, in that location is an in-built characteristic in Excel that allows you to set up a row to print on every page (or set a cavalcade to impress on every page).
In this tutorial, I will show you all the steps you demand to exercise set the headers to show up on every printed page.
How to Gear up a Row to Print on Every Page in Excel
Suppose you have a dataset as shown below where there are hundreds of rows of data with the header in the showtime row.
If y'all print this data in the electric current form, y'all volition simply go the header on the showtime page and rest all the page will have simply the data and not the headers.
Below are the steps to make sure the headers echo on every printed folio:
- Click on the Page Layout option in the ribbon

- In the Page Setup group, click on the 'Print Titles' choice. This will open the 'Folio Setup' dialog box

- In the Page Setup dialog box, click on the cell selector icon (up arrow) for the 'Rows to echo at top' pick
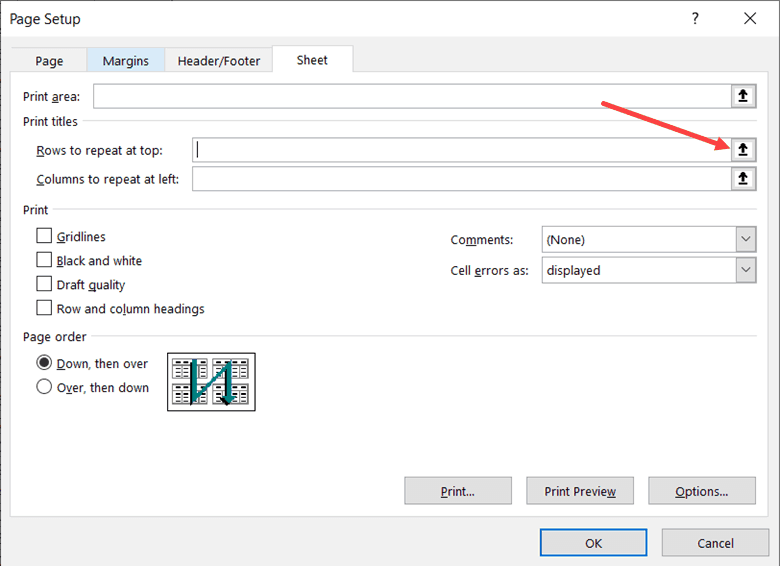
- In the dataset, select the header cells (yous can also select the unabridged row if you want)

- Click OK
Now, when you print the data, you will accept the selected header row cells repeat on every page.
You tin can employ the aforementioned steps to besides repeat multiple rows on each page (in case your headers occupy more than than one row), equally well as repeat one or more ane column on each folio.
Note: It's best to cheque the impress preview before printing the worksheet. The print preview will show you exactly what will be printed on each sheet. To do this, click on the 'File' tab and so click on 'Print'.
Also, it'due south not necessary to always accept the rows that you lot want to repeat at the top. For example, if you desire to repeat row numbers 4 and 5, you tin select these rows in step 4. Now, when Excel is press your data, information technology will impress the starting time folio every bit expected, and from the second page onwards, it volition accept row #four and #v at the height, which will echo on all pages.
Advanced Concept: When y'all specify the rows/columns to echo, Excel creates a named range with the name Print_Titles. This named range holds the range that Excel needs to repeat on each folio. So even if you shut the workbook and open later on, Excel would retrieve what rows/columns need to exist repeated.
I hope you constitute this Excel tutorial useful.
You lot may also like the following Excel tutorials:
- How to Set up a Row to Print on Every Folio in Excel
- How to Fit to Page in Excel
- How to Middle the Worksheet Horizontally on the Page in Excel
- How to Print Row Numbers in Excel
- How to Print Gridlines in Excel

Source: https://spreadsheetplanet.com/set-row-to-print-on-every-page-excel/
Posted by: fultonvellut.blogspot.com
0 Response to "How To Set Rows As Print Titles In Excel"
Post a Comment